Space Dust Studios

Developer Blog

Month: May 2014

Character Design: Space Dust Racing

So far you’ve been blessed by Michael’s sultry tones offering valuable process and workflow advice for new remote development teams.

This post however, you have me – Nathan (AKA napes) – I’m the Art Director at Space Dust Studios, and while less sultry, I hope you enjoy finding out more about the process I use for creating characters for Space Dust Racing, complete from scribbles through to a 3d model.

The Brief

“Create multiple unique characters with a combative cartoon sci-fi bent.”
I intentionally went about this without any preconceptions and instead let the process drive the initial ideas. If you’re naturally more of a hard-surface/mechanical concept artist (I am), this process will hopefully loosen you up a bit too 🙂

Scribbles to Thumbnails

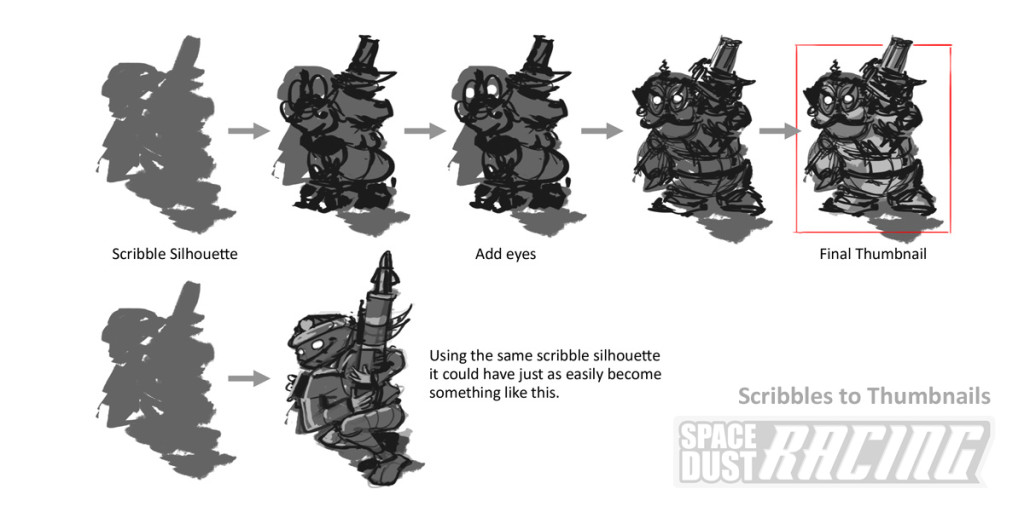
This is a really fun part of the process. I literally scribble shapes that have roughly the right dimensions, but intentionally don’t think too much about them. Some loose sketching and a couple of spots for eyes trigger possible ideas for forms, shapes and poses. The great thing about this process is that 1 scribble silhouette can yield multiple ideas depending on how it is interpreted. I sometimes play this game with my kids where we share a silhouette, and see what each of us makes!

The image below shows a breakdown for Piccolo Diablo, our mean moustachioed intergalactic taxi driver.

SDS-ScribblesToThumbnails

This scribble silhouette could have become any number of thumbnail characters


I end up doing loads of these thumbnails, most of which get discarded.

As nice or interesting forms emerge, so do possible stories for this character – good or evil, their role or where they’re from – and as the story evolves, so does the sketch which in turn adds more detail to the story – it’s a cool little circle.

Review Sheets

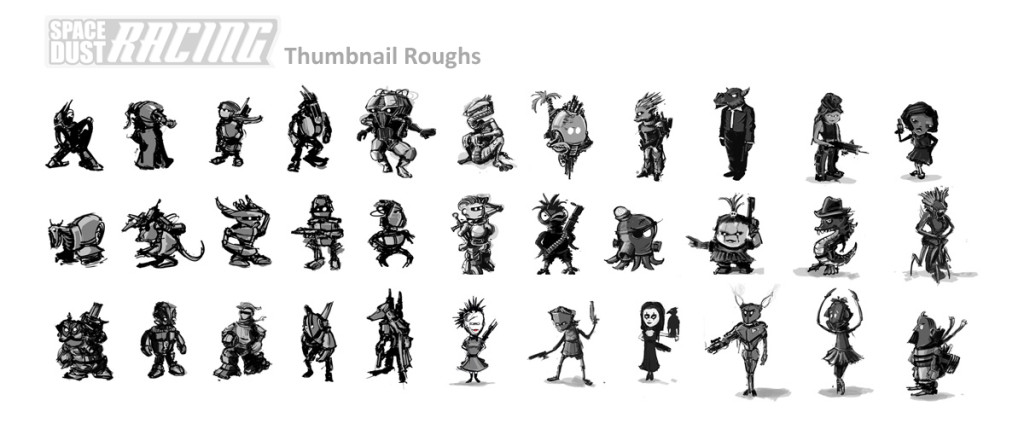
After I have a sheet of 10 to 15 thumbnails which have something interesting going on, I send them out to the team for a ‘gut-feeling’ review. This is without any story information – it is purely about identifying which thumbnails visually resonate well within the group – they have to feel good first!

SDS-ThumbnailRoughs

Some of the thumbnails sent out to the team – some survived… most did not!

Working up a colour concept

From a chosen thumbnail (in this case I’m going to continue using Picollo Diablo) I start working up the colour concept sketch.
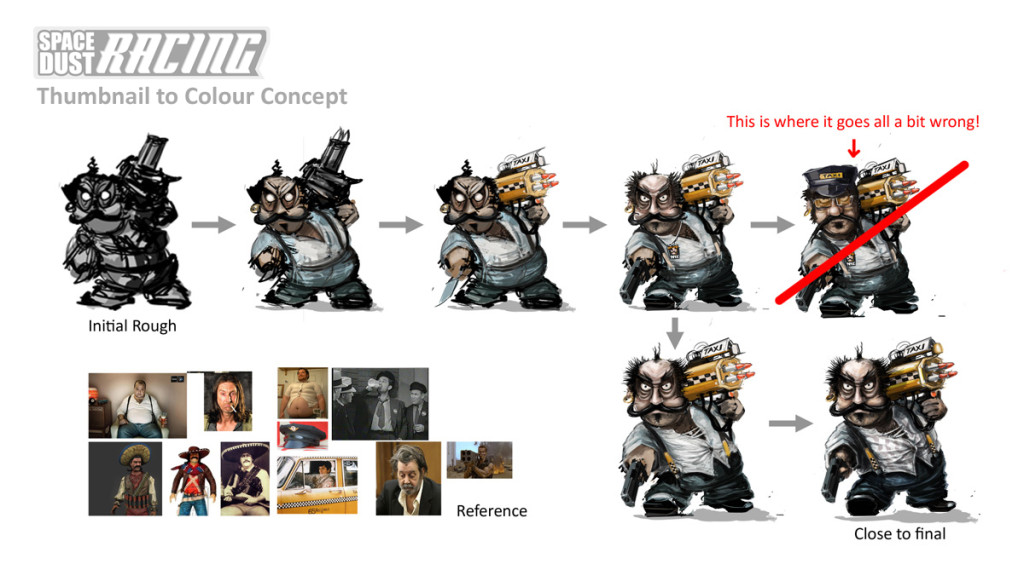
In Space Dust Racing, colour is super important as our characters must have unique palettes and silhouettes, so I gather thematic and colour reference to sample from (bottom left of image).
This is also the stage where I start to flesh out detail, and sometimes things go wrong as you can see from the progression below. I started losing my way, and Picollo Diablo began to look like a cross between John Goodman and one of the Village People! I was still happy with his back-story, so I bounced the WIP out to the team for feedback, and ended up reverting back to an earlier sketch and continuing again from there.

SDS-ThumbnailToColourConcept

From a Thumbnail to Concept – sometimes things don’t always go to plan!

This process resulted in these initial character concepts below, though it’s important to note that not all of these will make it into the final game!

SDS Dust Racing Line Up

Some of these characters will miss the cut!

Prep for 3D’ifying

Generally the more detail you can provide the 3D artist, the better – ideally orthographic drawings (front/back/side), a colour concept and/or material reference.

However…we’re lucky as our senior 3D artists Grigor ‘Grigs’ Pedrioli and Stephen ‘Pops’ Honegger are really experienced (and frankly awesome not to mention good looking). They can do wonders with the bare minimum of reference. So for this next section I’m going to use a different character – Sarge!

As the colour concept for Sarge is close to front on, I provide Grigs with a rough side projection showing basic detail for his torso, posture, odd leg/hip shape and arm.

SDS-SketchFor3DArtist

The rough sketch for 3D Artist ‘Grigs’ showing the important details for Sarge.


A few chats here and there, and a few days later back comes this great 3D model. Sarge’s character has really transferred across from the sketches, which is awesome!

SDS-UntexturedMesh

The final un-textured mesh. Even without materials and colour, Sarge has plenty of character!

So that’s it for this post – hope you enjoyed it and please post comments below. In a future post we hope to show some modeling/texturing walk-throughs  and  best practice.

Finally – there are many ways of generating non-realistic character ideas and none are ‘wrong’. However, providing 3D Artists with the right details and clear information will always result in better looking in-game characters!

Cheers, (n)

Tools and processes for remote game development – Part 3: Security and backups

Our AutoBackup Python script.

Ahh, the corporate video game lifestyle. quad 24″ monitors, $1000 office chairs, free snacks, and beer o’clock. But when you and four colleagues throw that lifestyle away to pursue your indie game dev dreams, more often than not you can’t (and shouldn’t) rent a fancy office, because in case you weren’t paying attention, you’re now peasants and every cent counts. But with the right tools and processes, you can work together remotely on a tight budget.

In this three-part article, I’ll run through the tools and processes we use for remote game development at Space Dust Studios. Part 1 focuses on communication, Part 2 focuses on collaboration, and Part 3 focuses on security and backups. We’ve evolved this setup over the last 12 months and it’s working well for us, though we’re a team of five living in the same city, so your mileage may vary. If you’re working with a bigger team or are spread across different time zones, you may need to make some changes.

We’re always on the lookout for improvements, so please leave a comment if you’ve got suggestions!


Part 3. Security and Backups

By working remotely you’re pushing a lot of sensitive information into the cloud. It’s worth thinking carefully about security for every service you’re using, particularly if your company is going to be entering the public eye, which will also attract the attention of hackers (even if they are just 15 year olds).

Private vs public

Make sure with any private service you’re using that the information isn’t publicly available. It’s good practice to try and hack into your stuff from a fresh browser with nothing logged in, and by trying to follow internal email links on outbound emails. If you’re posting internal videos on YouTube, make sure they’re unlisted or privately shared, or better yet, upload your videos to Google Drive instead. You’ll get the same YouTube-style player without the risk of accidentally making it public on your YouTube channel.

2-step verification

Make sure everyone on the team is using 2-step verification where possible. This includes all Google and Apple services, as well as Dropbox. It adds an extra layer of security to your accounts, requiring a password and a code sent to your phone over SMS. You really don’t want someone getting into your company email archive in the cloud!

One potential gotcha with 2-step verification is travelling. If you’re attending an overseas conference or trade show, double-check with your phone company that international roaming is turned on before you head over there.

Virtual private networks (VPN) and SSH tunnels

If you’re too cheap for dedicated hosting (which we are), never expose a service on your local network (such as Perforce or VNC) directly to the web. Instead you can use a VPN to let team members log in securely to your home network, although personally I prefer using SSH as I can directly control which ports and services team members can access.

There are many free SSH servers and clients out there to choose from, although be careful of the licensing terms which may stipulate they’re for personal-use only.

Use an unusual (and high) port number for your SSH connection, instead of the usual 22 or 443, and opt for public key authentication over passwords, to prevent man-in-the-middle attacks.

Password salting

You’re going to be creating a lot of company logins for various online services, so be sure to use different passwords for each one. Prefer long passwords over short ones where possible. A simple solution for an easy-to-recall yet hard-to-hack password is to “salt” a master password: take the original password and add something different for each service, based on an easy-to-remember rule like “the last letter of the service name”. (Make up your own rule though.) Talking about password salting in detail is beyond the scope of this post, but you can read more about it here if you’re a big cryptography nerd: Secure Salted Password Hashing.

Automated backups

Maybe one day you’ll get hacked. Maybe a hard drive will fail. Maybe Google will go belly up and take all your email with them. Maybe an employee will accidentally delete the entire contents of your master server. Whatever the cause, you really need your own on-site company backup solution for disaster recovery.

The easiest backups are the ones that happen automatically. We wrote a cheap-and-nasty Python script (why am I so disparaging towards my Python scripts?) that backs up the contents of our Dropbox, Google Drive, Perforce, Trello, mailboxes, and our websites plus their MySQL databases into DVD-sized password-protected RAR files. Make sure you add a RAR data recovery record so the archive can handle some data corruption, and copy the files onto multiple physical media (ideally of different types) as part of the automated backup process.

They’re not cheap, but you can get external RAID hard drive enclosures to protect against hard drive failure. We use my personal WD MyBook Studio II, which has 2TB storage mirrored in RAID-1 across two x 2TB drives.

Off-site backups

We also create manual off-site backups to protect against fire and theft by copying the RAR files onto a USB key, then stashing that in a waterproof bag in my garden shed. It all sounds very cloak and dagger, and it is, so just roll with it and pretend to be James Bond while your partner watches on, shaking her head pitifully. Another option would be auto-uploading the RAR files to an FTP server, but our total backup size is already at 20GB, and my broadband upload speeds aren’t that great, so that’s out for us.

Restoring

It’s great to have backups, but have you actually tried restoring your data from them? It’s worth taking the extra time to do this, even if you just restore to a different location for testing purposes. Otherwise the backups are useless, and you may as well have done nothing. Iron out the glitches at the very beginning, not when you’re up the proverbial creek with the next milestone due in 24 hours.


Everything outlined above is working well for us now, but as we ramp up our team and projects we’ll most certainly need to get office space. But for that awkward period between starting your company and bringing home the bacon, hopefully the tools and processes I’ve covered here will help get your team and project moving along for very little financial investment.


Have we missed something? Please let us know in the comments and we’ll add it to the post!

Tools and processes for remote game development – Part 2: Collaboration

Michael's new desk at Space Dust Studios.

Ahh, the corporate video game lifestyle. quad 24″ monitors, $1000 office chairs, free snacks, and beer o’clock. But when you and four colleagues throw that lifestyle away to pursue your indie game dev dreams, more often than not you can’t (and shouldn’t) rent a fancy office, because in case you weren’t paying attention, you’re now peasants and every cent counts. But with the right tools and processes, you can work together remotely on a tight budget.

In this three-part article, I’ll run through the tools and processes we use for remote game development at Space Dust Studios. Part 1 focuses on communication, Part 2 focuses on collaboration, and Part 3 focuses on security and backups. We’ve evolved this setup over the last 12 months and it’s working well for us, though we’re a team of five living in the same city, so your mileage may vary. If you’re working with a bigger team or are spread across different time zones, you may need to make some changes.

We’re always on the lookout for improvements, so please leave a comment if you’ve got suggestions!


Part 2. Collaboration

Office software

You can probably get away with a cloud-based office suite like Google Docs for most of the work you’ll be doing, but occasionally you’ll need something a bit richer in features, particularly with spreadsheets and presentations. The main thing here is to be consistent – pick a standard office suite (Libre Office is a good free suite, or alternatively see if you’re eligible for Microsoft’s Bizspark program for the Office suite – thanks to reader Doolwind!) and make sure everyone is using that version. Document it as part of the team setup instructions on the wiki.

Task tracking

There are many all-in-one cloud-based project management solutions around, such as Asana, Basecamp, JIRA, Producteev.and Proofhub. But we like keeping things simple, so unsurprisingly we’re huge fans of Trello (shameless referral link) for its bare bones functionality and transparency across the team… plus it’s free!

We use Trello for agile task tracking, bug and issue tracking, items for our meeting agenda, temporary notes and instructions (when the wiki just feels too permanent), and for keeping a running task backlog (ie. stuff that’s not relevant right now, but we don’t want to forget about). In total we’ve got eight lists: Meeting agenda, Task Backlog, Temporary Notes, Michael, Nathan, Glen, Grigor, Stephen.

When we’re holding a meeting, one of us keeps Trello open and runs through the meeting agenda items. Items stay put if they’re to be discussed further in the next meeting, or move onto individual task lists as actions, or move into the backlog if we’re postponing them. At the end of the meeting, we quickly review our own task lists and the task backlog to see if anything needs adjusting, then we’re done. It’s a pretty simple system that anyone can drive, refer back to later, and it updates easily from a laptop or smartphone.

File sharing

It used to be Dropbox (shameless referral link) or bust, but now we’re spoiled for choice: Box, Google Drive and SkyDrive are viable alternatives, and there are many other open-source options around if you want to run your own service.

For internal file sharing we prefer Google Drive, because its integration with Google Docs allows us to keep our web-based wiki documents and files in the same hierarchy.

For external file sharing with partners and clients we’ve gone with Dropbox, partly because it’s a well-known (and thus perceived as trustworthy) service, but mostly because it’s dead simple to share folder links, and it also provides a rich web interface to quickly preview and download files, which is quite important when you’re sharing large videos, PDFs and images for your game.

We use file sharing for any assets that don’t need to be version controlled. If something is a source asset for a build (such as a website or a game), it lives under version control, otherwise it goes into file sharing. For more information on why this is a good idea, see section 5 (Builds) of Perforce’s white paper High-Level Software Version Management Best Practices.

We also place the binaries for important milestone builds in file sharing, so everyone has quick access to working builds for unexpected demos.

Version control

You absolutely need proper version control to develop games. Here’s why. There are many free options out there for version control, but video games are a very specific subset of software development. They often require non-technical people to commit changes, and the assets extend far beyond code, including binary file formats such as 3D models, audio, video and music. The repositories can get big, fast! So I’m going to strongly recommend the one version control that’s never ever failed me in 12 years of video game development:

Perforce. It’s the industry standard, and is free for up to 20 users and workspaces. It integrates with many game engines out of the box, and is a centralized version control system, meaning it’s simpler for artists and designers to learn how to use as there are less steps involved, plus the user interface tends to be a lot simpler than open-source alternatives. (Sorry Git.)

One great feature of Perforce is shelving. You can quickly stash unfinished local changes into a safe place on the server then revert them from your local build, allowing you to quickly task-switch and keep changes grouped together logically. Others can also review your shelved changes on the server, which is really useful for doing remote code reviews. They can also unshelve the changes as their own to continue where you left off. Other version control solutions offer similar features, but none make it quite as easy as Perforce does (in my humble opinion).

Another great feature is the ability to see other users’ pending changelists. If someone hasn’t checked their email and they’re not on IM, you’re still able to identify what they’re working on, and avoid stepping on their toes.

You can run a Perforce server on just about any platform, locally or in the cloud. I’ve got ours running on a small Windows 7 HTPC in my lounge room, mostly because we’re not ready to pay a monthly fee for dedicated hosting. It’s not the fastest connection in the world (and this is where dedicated hosting shines), but if team members do most of their big syncs overnight with a build script, you can avoid major headaches during the day.

Continuous integration

We actually don’t do this step yet (it’s on our to do list), but it’s good practice to have a dedicated build machine somewhere that’s constantly pulling down tip from version control, making all combinations of the build, and notifying everyone if there are any problems. Bonus points if it pinpoints a changelist range that broke the build and emails those who broke it. Extra bonus points if you alert users about to grab tip from version control when there are problems.

A busted build in version control, or a build littered with debug asserts, is a huge time waster for everyone. It happens from time to time, and on smaller teams it’s less of an issue, but you’ll really want continuous integration as you scale up, otherwise your team productivity is going to take a big hit. You can author a build monitor script in just about any language, but the fine details will depend heavily on the engine and tech you’re using.

Code reviews

As a general policy, we don’t allow any code changes into version control unless they’ve been reviewed by someone else. This is great for catching bugs before they make it into the build. It forces you to think twice about what you’re submitting, and to self-review before you ask someone else to take a look. It’s strongly encouraged to run through your changes line-by-line before asking anyone else to take a look, if only to save you the embarrassment of accidentally code reviewing (or worse, checking in) debug code.

Check-in descriptions

It’s tempting to skip writing up proper changes for version control, but the bigger a project gets, the more likely you are to start digging through file histories. Nothing is more infuriating than coming across changelists that touch 34 separate files with the changelist description “LOL refactored!! #yolo”. Create a check-in description template, with a checklist attached, and enforce the template for all code checkins. Future you will say thank you. Here’s ours for reference:

[Project Identifier] One-sentence summary

More detailed summary of the changes. A short paragraph is ideal.

<Optional: Bug/task ID and URL to project management software>

Built: <which profile did you build? debug/release etc.>
Tested: <which level did you test?>
Code review buddy: <who did the code review?>

Check-in checklist - delete this section when done:
- Reconcile offline work (ensure no files are missing from the changelist).
- Add a one-sentence summary to the top of any new source files with author and date.
- Ensure all new functions have sensible asserts for parameters.
- Ensure any non-obvious code is commented appropriately.
- Are there any code smells? Refactor and re-test before checking in, while it's still fresh!
- Is there more than one logical change in this changelist? If so, split it into two changelists before checking in.

Desktop build helper
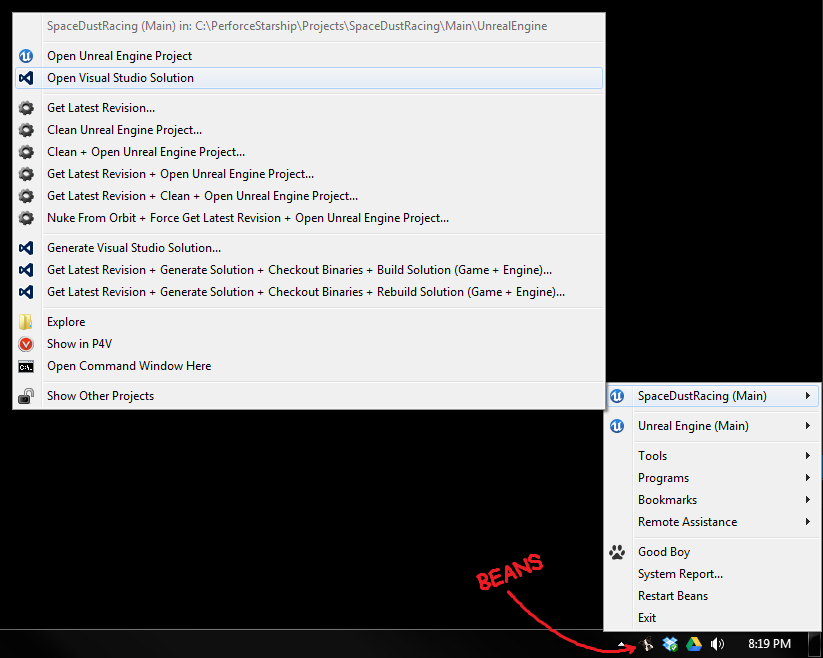
Beans, the Space Dust Studios desktop build helper.

Beans, the Space Dust Studios desktop build helper.


Meet Beans, the Space Dust Studios desktop build helper! He’s an abomination of this Python script, which we’ve re-appropriated to handle all of our repetitive tasks and actions.

A system-tray build helper like this comes in really handy as you move through production, mostly for the time and stress it saves on performing repetitive actions, particularly for content creators who may not have the programmer know-how to automate their own tasks.

For each project, Beans can clean the project folder out, re-sync from Perforce, nuke it from orbit (it’s the only way to be sure!), and rebuild code solutions. He can also batch operations together, so you can set and forget him, then make yourself a cup of tea or retire for the evening. Beans also contains shortcuts to commonly used programs and web bookmarks, and hooks into the Windows Remote Assistance tool, which means we can easily remote desktop into each others’ machines when we’re experiencing technical troubles and need someone to hold our hand.

Obviously there’s lots of potential with a build helper to make everyone’s day-to-day lives easier, so it’s good practice to regularly ask team members what’s making them want to die in terms of the pipeline, and seeing if there’s easy ways to automate repetitive actions within the desktop build helper.

Beans has a lot of room for improvement. He’s lacking a command-line interface for scripting, and he doesn’t notify us about broken builds. But these can come later… to start, aim to make the lives of content creators easier.


Everything outlined above is working well for us now, but as we ramp up our team and projects we’ll most certainly need to get office space. But for that awkward period between starting your company and bringing home the bacon, hopefully the tools and processes I’ve covered here will help get your team and project moving along for very little financial investment.


Have we missed something? Please let us know in the comments and we’ll add it to the post!
© 2024 Space Dust Studios

Theme by Anders NorenUp ↑